Uploading a questionnaire from Salesforce
Overview
If you would like to be able to upload questionnaires into Conveyor directly from Salesforce, you can do that with the Conveyor API and some configuration in your Salesforce instance.
There are many ways you can configure your Salesforce instance to hit our API, and this page is just one example of how you can do it. Specifically, we will walk through how to create a button (what Salesforce calls a "Quick Action") on a Salesforce opportunity page that creates a questionnaire, with the questionnaire file sent to Conveyor as well as uploaded to the opportunity.
Conveyor API
To get your Conveyor API token, follow the instructions here: https://docs.conveyor.com/reference/api-token. Once you have that token, you need to pass it on to your Salesforce administrator to complete the following setup steps.
Create a new Remote Site Setting
- Go to "Setup"
- In the left panel's quick search input, type "Remote Site Settings"
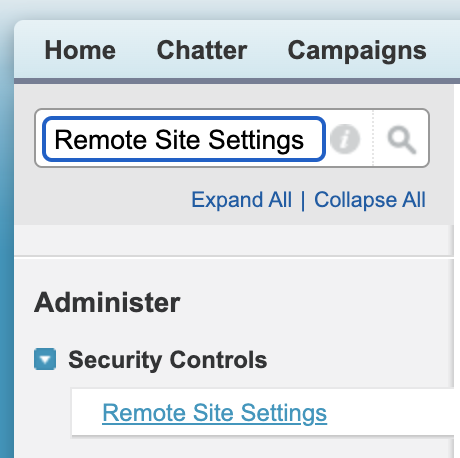
- Click on the search result "Remote Site Settings" under "Security Controls"
- Click "New Remote Site"
- For the "Remote Site Name", put "Conveyor"
- For the "Remote Site URL", put "https://api.conveyor.com"
- Make sure the "Active" checkbox is checked and click "Save"
Create a new Apex Class in a connected sandbox instance
To make this button work, we need to create an Apex Class in Salesforce. However, this cannot be done directly in your production Salesforce instance, and must first be done in a connection sandbox instance, and then pushed to your production instance via a Change Set.
- Create, or go to a connected Salesforce sandbox instance
- If you don't have one already, you can follow Salesforce's instructions here
- To to "Setup" in the sandbox instance, and in the left panel's quick search input, type "Apex Classes"
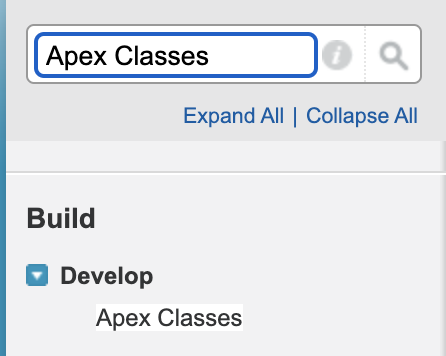
- Click on the search result "Apex Classes" under "Develop"
- Click "New"
- Add the following code, making sure to substitute "YOUR_KEY_HERE" with the API key you or your colleague created above
public with sharing class Questionnaire {
// Fill this in with your API key:
static final String apiKey = 'YOUR_KEY_HERE';
static final String apiBase = 'https://api.conveyor.com/api/v2/';
static final String postQuestionnaireEndpoint = apiBase + 'questionnaires';
static final String fetchProductLinesEndpoint = apiBase + 'product_lines';
@AuraEnabled
public static String postQuestionnaire(
String domain,
String portalUrl,
String notes,
String originalFormat,
String productLineIds,
String contentVersionId,
String filename,
String contentType
){
String userName = UserInfo.getUserName();
User activeUser = [Select Email From User where Username = : userName limit 1];
String email = activeUser.Email;
HttpRequest req = new HttpRequest();
req.setHeader('Content-Type', 'application/x-www-form-urlencoded');
req.setHeader('X-API-KEY', apiKey);
req.setEndpoint(postQuestionnaireEndpoint);
req.setMethod('POST');
String reqBodyString = 'email=';
reqBodyString += EncodingUtil.urlEncode(email, 'UTF-8');
reqBodyString += '&domain=';
reqBodyString += EncodingUtil.urlEncode(domain, 'UTF-8');
if (!String.isBlank(portalUrl)) {
reqBodyString += '&portal_url=';
reqBodyString += EncodingUtil.urlEncode(portalUrl, 'UTF-8');
}
if (!String.isBlank(notes)) {
reqBodyString += '¬es=';
reqBodyString += EncodingUtil.urlEncode(notes, 'UTF-8');
}
reqBodyString += '&original_format=';
reqBodyString += EncodingUtil.urlEncode(originalFormat, 'UTF-8');
reqBodyString += '&product_line_ids=';
reqBodyString += EncodingUtil.urlEncode(productLineIds, 'UTF-8');
if (!String.isBlank(contentVersionId)) {
reqBodyString += '&content_version_id=';
reqBodyString += EncodingUtil.urlEncode(contentVersionId, 'UTF-8');
}
if (!String.isBlank(filename)) {
reqBodyString += '&filename=';
reqBodyString += EncodingUtil.urlEncode(filename, 'UTF-8');
}
if (!String.isBlank(contentType)) {
reqBodyString += '&content_type=';
reqBodyString += EncodingUtil.urlEncode(contentType, 'UTF-8');
}
req.setBody(reqBodyString);
HTTPResponse res = new Http().send(req);
System.debug(res.getStatus());
System.debug(res.getBody());
return res.getBody();
}
@AuraEnabled
public static String fetchProductLines(){
HttpRequest req = new HttpRequest();
req.setHeader('Content-Type', 'application/json');
req.setHeader('X-API-KEY', apiKey);
req.setEndpoint(fetchProductLinesEndpoint);
req.setMethod('GET');
HTTPResponse res = new Http().send(req);
System.debug(res.getStatus());
System.debug(res.getBody());
return res.getBody();
}
public class MyException extends Exception{}
}
- Click "Save"
Create an Outbound Change Set
- While still in the sandbox instance, in the left panel's quick search input, type "Deployment"
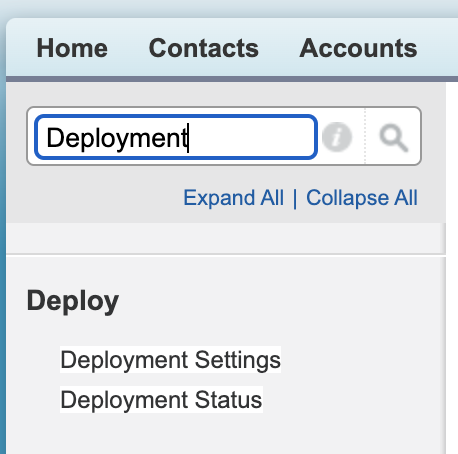
- Click on the search result "Deployment Settings" under "Deploy"
- Make sure that your sandbox instance has an arrow pointing to "Production", indicating your sandbox is able to push outbound change sets to your production instance
- If two are connected by a broken line, follow these instructions for how to authorize that connection. Note - you need to do this inside your production instance
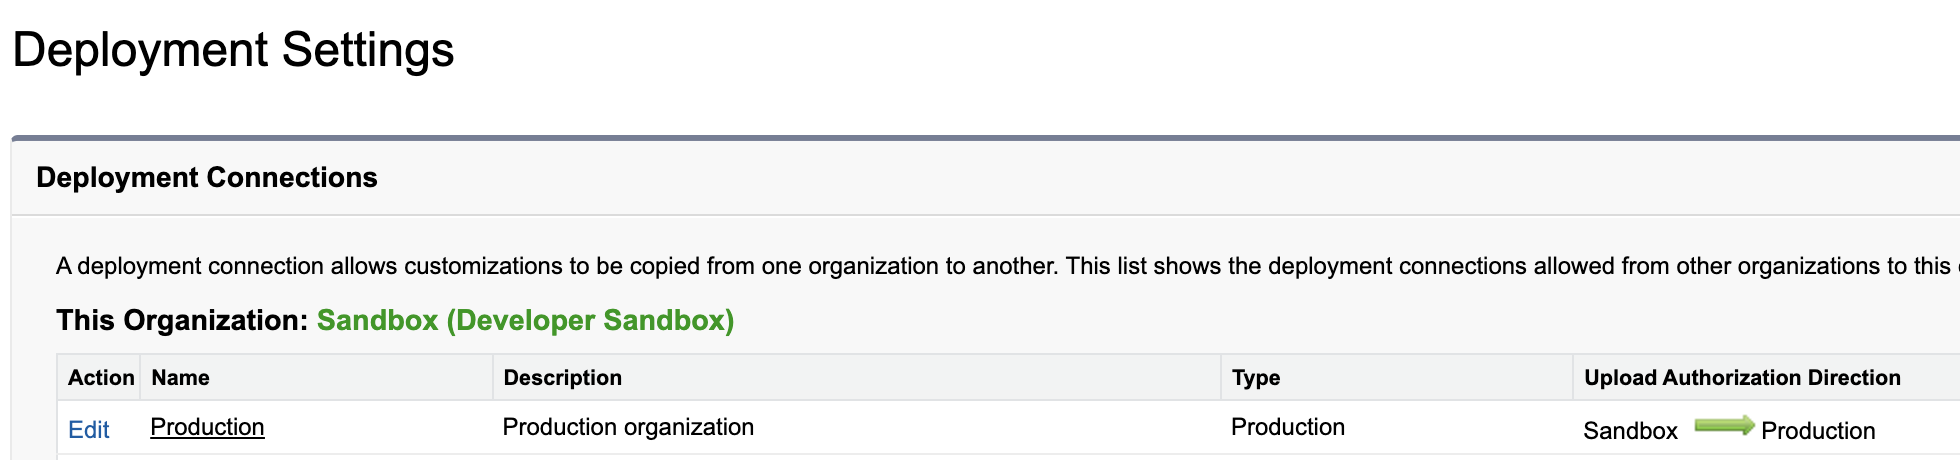
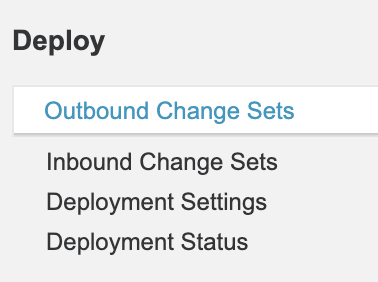
- In the left menu, now click on "Outbound Change Sets"
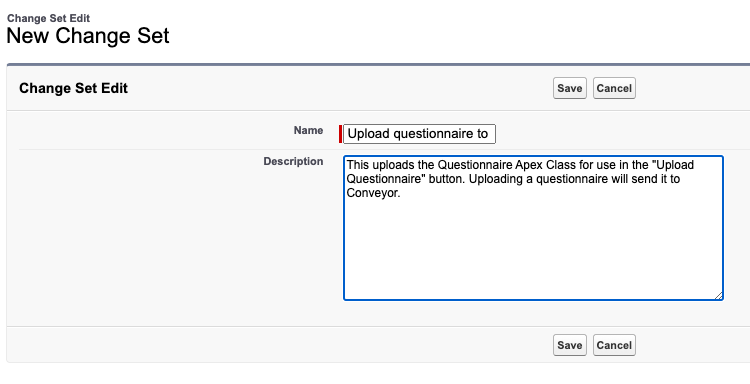
- Click "New"
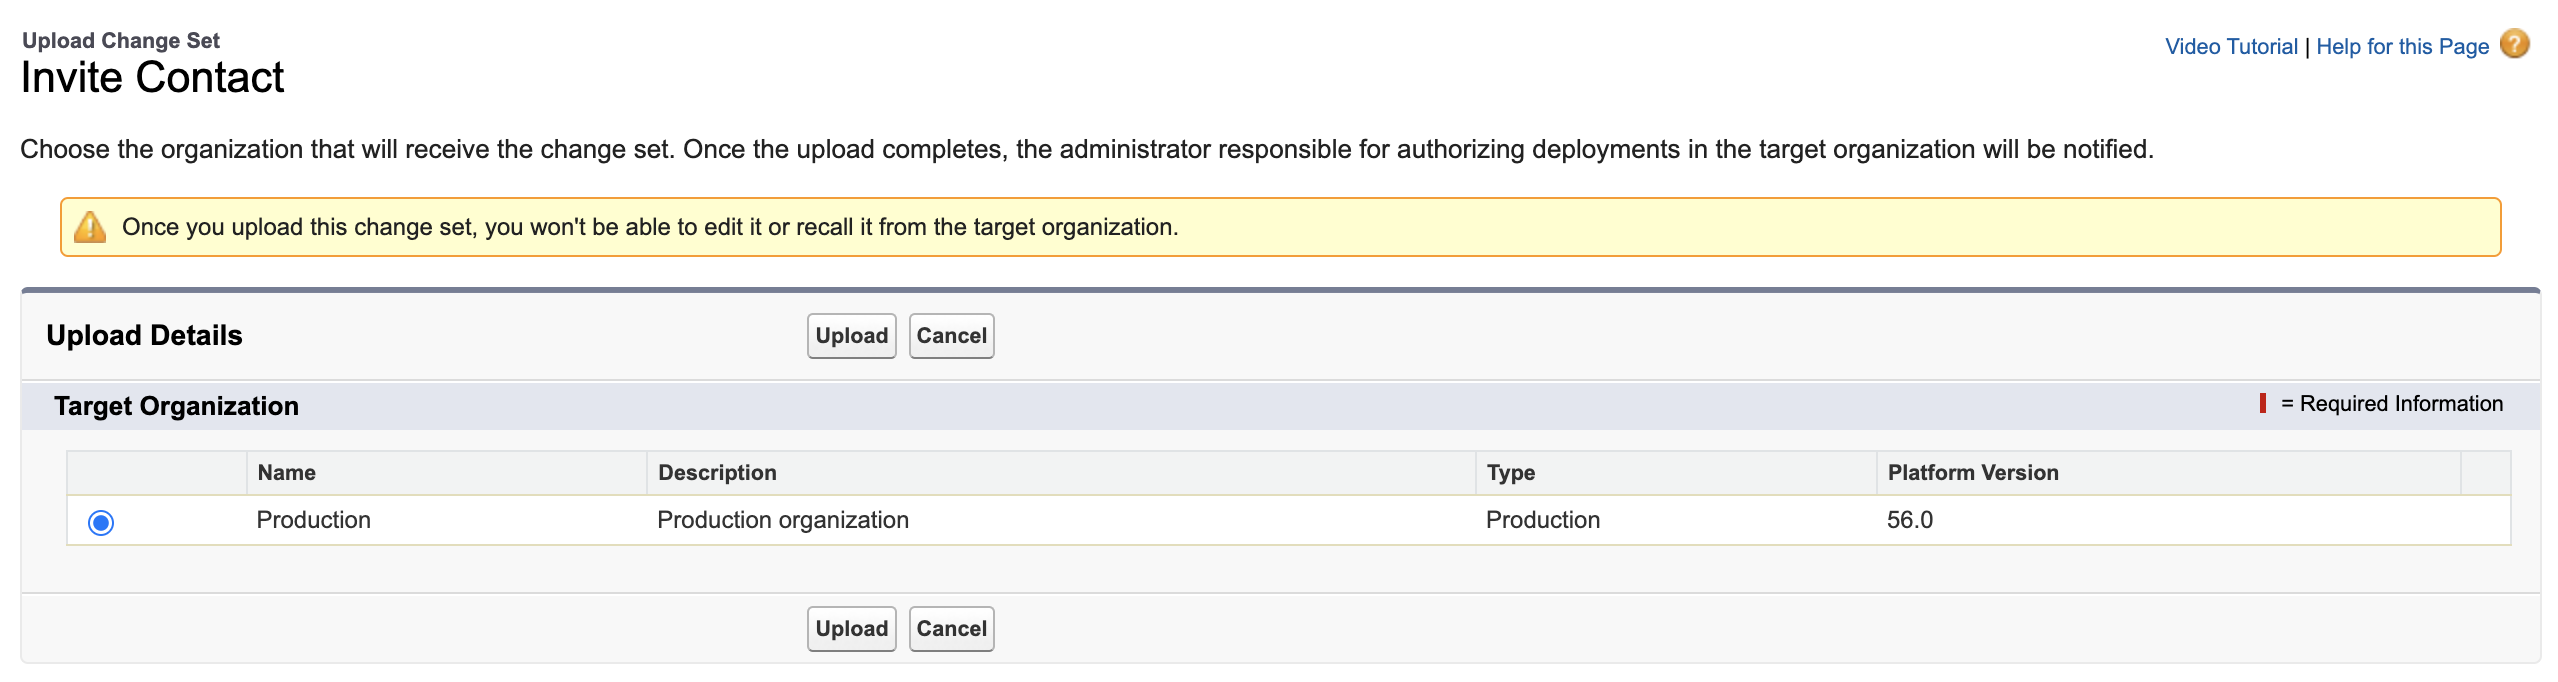
- Enter "Upload questionnaire to Conveyor" or whatever name / description you think best describes the Change Set
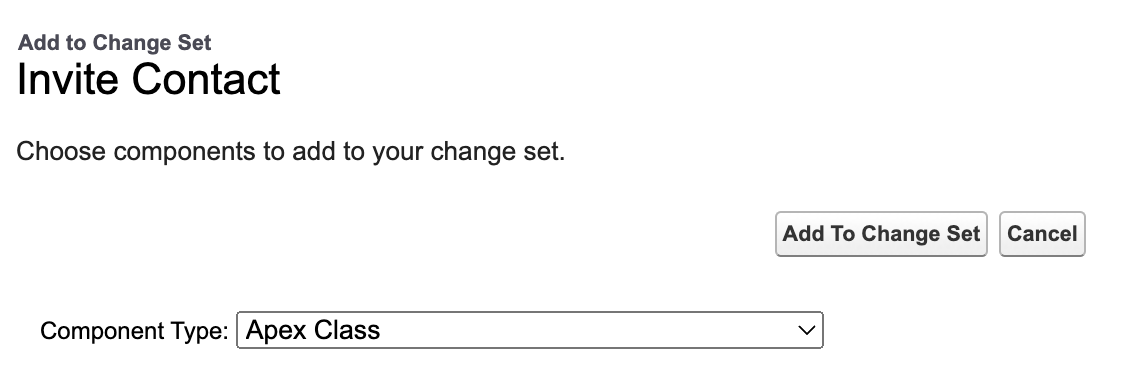
- Once created, add the Apex Class that we created above to this Change Set. You will need to change the "Component Type" dropdown to "Apex Class" in order to find it
- Then, click "Upload"
- You will need to select and confirm the target instance for your Change Set. Select "Production" and click "Upload"
Deploy the Inbound Change Set
- Back in your production instance, in the left panel's quick search input, type "Inbound"
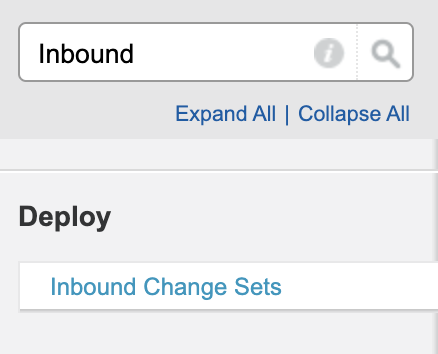
- Click on the search result "Inbound Change Sets" under "Deploy"
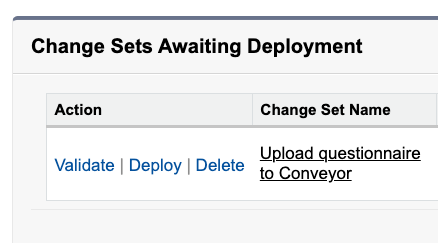
- You should see the Change Set that you sent over from your sandbox instance
- Click "Deploy" and follow the instructions to deploy the Change Set to production
- Note that this could take awhile, depending on how many tests your production instance has to go through on any existing Apex Classes - you should receive an email notification from Salesforce when deployment is complete
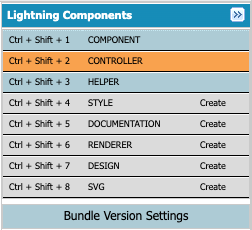
Create a new Aura Component
- Open up your Salesforce "Developer Console"
- Note that we're still in the production instance, and will be for the remainder of our instructions here
- Under "File", click on "New" and then "Lightning Component"
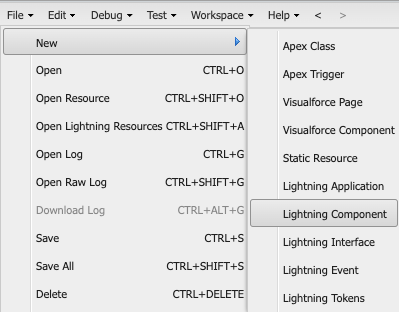
- Name the file something like "Upload_Questionnaire"
- Check the checkbox labelled "Lightning Quick Action"
- Click "Submit"
- After the file creates, in the "Component" section (the default, first section), add the following code:

<aura:component controller="Questionnaire" implements="force:hasRecordId,force:lightningQuickActionWithoutHeader">
    <aura:handler name="init" value="{!this}" action="{!c.doInit}"/>
    <aura:html tag="style">
        .cuf-content {
            padding: 0 0rem !important;
        }
        .slds-p-around--medium {
            padding: 0rem !important;
        }
        .slds-modal__content{
            overflow-y:hidden !important;
            height:unset !important;
            max-height:unset !important;
        }
        .myCheckbox{
            display: inline-block;
            float: left;
            margin-right: 10px;
        }

        /* remove the "or drop files" label from the right of the lightning:input type file */
        .slds-file-selector__text{
            display: none;
        }

        /* remove the "Upload Files" text from the button of the lightning:input type file */
        .slds-file-selector__button{
            font-size: 0;
        }

        /* insert the text "Upload File" into the button of the lightning:input type file */
        .slds-file-selector__button:after{
            content: 'Upload File';
            font-size: .8125rem;
            color: rgba(27, 82, 151, 1.0);
        }
    </aura:html>

    <aura:attribute name="loading" type="String" />
    <aura:attribute name="recordId" type="String" />
    <aura:attribute name="domain" type="String"/>
    <aura:attribute name="productLines" type="Map[]"/>
    <aura:attribute name="productLineIds" type="String[]"/>
    <aura:attribute name="originalFormat" type="String"/>
    <aura:attribute name="showFileUpload" type="Boolean"/>
    <aura:attribute name="filetype" type="List" default="['.pdf', '.txt', '.doc', 'docx', '.xls', '.xlsx', '.xlsm', '.csv']" />
    <aura:attribute name="filename" type="String"/>
    <aura:attribute name="contentType" type="String"/>
    <aura:attribute name="contentVersionId" type="String"/>
    <aura:attribute name="portalUrl" type="String"/>
    <aura:attribute name="notes" type="String"/>

    <header class="slds-modal__header">
        <h2 id="modal-heading-01" class="slds-modal__title slds-hyphenate">Upload Questionnaire to Conveyor</h2>
    </header>

    <div class="slds-modal__content slds-p-around_medium slds-is-relative">
        <lightning:input name="domain"
                         type="text"
                         label="Customer/prospect web domain (e.g. google.com)"
                         required="true"
                         onchange="{!c.onChangeDomain}" />

        <aura:if isTrue="{!v.productLines.length > 0}">
            <br />
            <p>Which products is this customer reviewing?</p>
            <aura:iteration items="{!v.productLines}" var="pl">
                <ui:inputCheckbox name="{!pl.id}" label="{!pl.name}" class="myCheckbox" change="{!c.onCheckProductLine}"/>
            </aura:iteration>
        </aura:if>

        <br />
        <lightning:select name="originalFormat" label="Questionnaire format" required="true" onchange="{!c.onChangeOriginalFormat}">
            <option value="file">File</option>
            <option value="portal">Web portal</option>
        </lightning:select>

        <br />
        <aura:if isTrue="{!v.showFileUpload}">
            <lightning:fileUpload label="* Attach file"
                                  name="fileUploader"
                                  required="true"
                                  accept="{!v.filetype}"
                                  recordId="{!v.recordId}"
                                  multiple="false"
                                  aura:id="lightningFileUpload"
                                  onuploadfinished="{!c.handleUploadFinished}" />
            <aura:set attribute="else">
                <lightning:input name="portalUrl"
                                 type="text"
                                 label="URL"
                                 required="true"
                                 placeholder="https://docs.google.com/spreadsheets..."
                                 onchange="{!c.onChangePortalUrl}" />

                <br />

                <lightning:textarea name="notes"
                                    required="true"
                                    type="text"
                                    label="How can the portal be accessed?"
                                    onchange="{!c.onChangeNotes}" />
            </aura:set>
        </aura:if>

        <aura:if isTrue="{!v.filename}">
            Current uploaded file: <ui:outputText value="{!v.filename}"/>
        </aura:if>

        <aura:if isTrue="{!v.loading}">
	        <lightning:spinner variant="brand" size="large"/>
        </aura:if>
    </div>

    <footer class="slds-modal__footer">
        <lightning:button name='Cancel' label='Cancel' onclick='{!c.closeModal}'/>
        <lightning:button variant="brand" name='Confirm' label='Upload' onclick='{!c.uploadQuestionnaire}'/>
    </footer>
</aura:component>
- Then, in the "Controller" (second) section, add the following code:
({
    doInit : function(cmp) {
        cmp.set("v.originalFormat", "file");
        cmp.set("v.showFileUpload", true);

        const action = cmp.get('c.fetchProductLines');
        action.setCallback(this, function(response){
            const state = response.getState();
            if (state === "SUCCESS") {
                try {
                    const productLines = JSON.parse(response.getReturnValue())._embedded.product_lines;
                    cmp.set("v.productLines", productLines);
                } catch (e) {
                    console.log(e)
                }
            } else if (state === "ERROR") {
                const errors = response.getError();
                if (errors) {
                    if (errors[0] && errors[0].message) {
                        console.log("Error message: " + errors[0].message);
                    }
                } else {
                    console.log("Unknown error");
                }
            }
        });
        $A.enqueueAction(action);
    },
    uploadQuestionnaire : function(cmp) {
        const action = cmp.get('c.postQuestionnaire');
        const domain = cmp.get('v.domain');
        const portalUrl = cmp.get('v.portalUrl');
        const notes = cmp.get('v.notes');
        const originalFormat = cmp.get('v.originalFormat');
        const productLineIds = cmp.get('v.productLineIds');
        const filename = cmp.get('v.filename');
        const contentType = cmp.get('v.contentType');
        const contentVersionId = cmp.get('v.contentVersionId');

        if (originalFormat === 'file' && !contentVersionId) {
            alert('Please upload a file');
            return;
        }

		if (originalFormat === 'portal' && !portalUrl) {
            alert('Please add the portal url');
            return;
        }

		if (originalFormat === 'portal' && !notes) {
            alert('Please add notes on how to access the portal');
            return;
        }

        const regex = /^[a-zA-Z0-9-]{1,61}[a-zA-Z0-9](?:\.[a-zA-Z]{2,})+$/;

		const domainMatches = domain.match(regex)
        if (!domainMatches) {
        	alert('Please provide a valid domain, like google.com (without www or https)');
            return;
        }

        cmp.set('v.loading', true);

        action.setParams(
            {
                domain : domain,
                portalUrl: portalUrl,
                notes : notes,
                originalFormat : originalFormat,
                productLineIds: productLineIds.join(','),
                filename: filename,
                contentType: contentType,
                contentVersionId: contentVersionId
            }
        );
        action.setCallback(this, function(response){
            const state = response.getState();

            if (state === "SUCCESS") {
                let returnValue = "Successfully uploaded questionnaire to Conveyor"

                try {
                    var jsonReturnValue = JSON.parse(response.getReturnValue());

                    if (jsonReturnValue.error) {
                        returnValue = jsonReturnValue.error;
                    }
                } catch (e) {
                    console.log(e)
                }

                alert(returnValue)

                // Close the modal
                $A.get("e.force:closeQuickAction").fire();
            } else if (state === "ERROR") {
                var errors = response.getError();
                if (errors) {
					console.log(errors);
                    if (errors[0] && errors[0].message) {
                        alert("Error message: " + errors[0].message);
                    } else {
                        alert(errors)
                    }
                } else {
                    console.log(errors);
                }
		        cmp.set('v.loading', true);
            }
        });
        $A.enqueueAction(action);
    },
    handleUploadFinished: function (cmp, event) {
        cmp.find("lightningFileUpload").set("v.multiple", false);
        // Only allow one file to be uploaded at once
        const uploadedFile = event.getParam("files")[0];
        cmp.set("v.filename", uploadedFile.name);
        cmp.set("v.contentType", uploadedFile.mimeType);
        cmp.set("v.contentVersionId", uploadedFile.contentVersionId);
        console.log(uploadedFile.contentVersionId)
    },
    onChangePortalUrl : function(cmp, event) {
        const portalUrl = event.getSource().get("v.value");
        cmp.set("v.portalUrl", portalUrl);
    },
    onChangeDomain : function(cmp, event) {
        const domain = event.getSource().get("v.value");
        cmp.set("v.domain", domain);
    },
    onChangeNotes : function(cmp, event) {
        const notes = event.detail.value;
        cmp.set("v.notes", notes);
    },
    onChangeOriginalFormat : function(cmp, event) {
        const selectedOriginalFormat = event.getSource().get("v.value");
        cmp.set("v.originalFormat", selectedOriginalFormat);
        const showFileUpload = selectedOriginalFormat == 'file'
        cmp.set("v.showFileUpload", showFileUpload);

        if (showFileUpload) {
            cmp.set("v.notes", "");
            cmp.set("v.portalUrl", "");
        } else {
            cmp.set("v.filename", "");
            cmp.set("v.contentType", "");
            cmp.set("v.contentVersionId", "");
        }
    },
    onCheckProductLine : function(cmp, event) {
        const currentProductLineIds = cmp.get('v.productLineIds');
        const id = event.getSource().get("v.name");
        const checked = event.getSource().get("v.value");

        if (checked) {
	        currentProductLineIds.push(id);
        } else {
            const index = currentProductLineIds.indexOf(id);
            currentProductLineIds.splice(index, 1);
        }

        cmp.set("v.productLineIds", currentProductLineIds);
    },
    closeModal : function(cmp) {
        $A.get("e.force:closeQuickAction").fire();
    }
})
Create a new Quick Action
- Still within "Setup", in the left panel's quick search input, type "Actions"
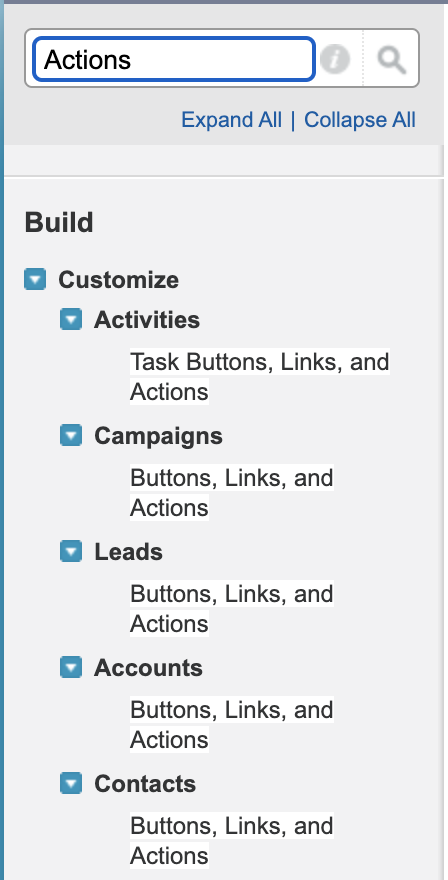
- Click on the search result "Buttons, Links, and Actions" under "Opportunities" (or wherever you want to put it)
- Click "New Action"
- Under "Action Type", select "Lightning Component"
- Under "Lightning Component", select "c:Upload_Questionnaire" (the name will be different if you named your Lightning Component something different when we created it above)
- Under "Label", put "Upload Questionnaire" or whatever button label you feel is best
- Click "Save"
Add the Quick Action to your page
- Still within "Setup", in the left panel's quick search input, type "Page Layouts"
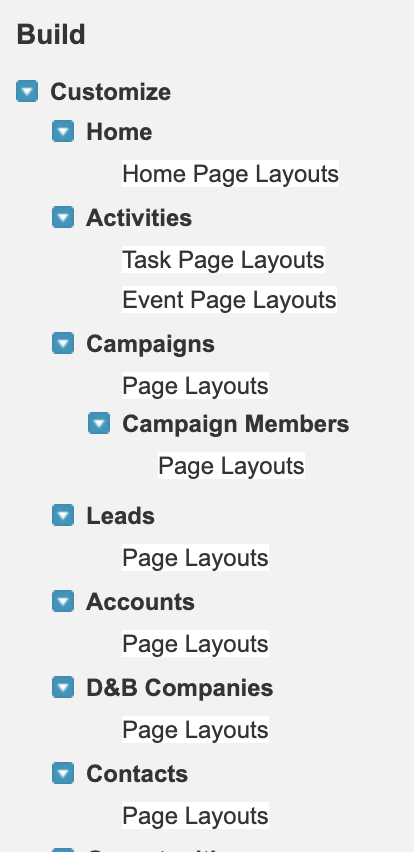
- Click on the search result "Page Layouts" under "Opportunities"
- Click "Edit" beside the layout you want to update (default would be "Opportunity Layout")
- In the top section, click "Mobile & Lightning Actions" on the left
- You should see the "Upload Questionnaire" (or whatever you named your label) button
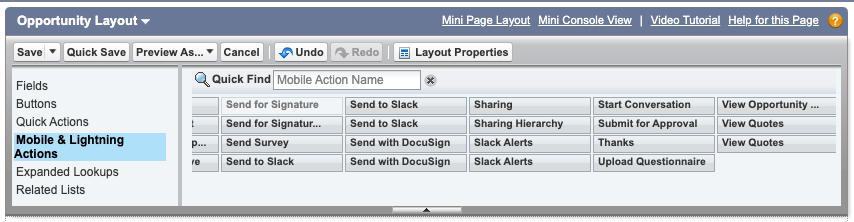
- Drag that button down to the "Salesforce Mobile and Lightning Experience Actions" section

- Click "Save" back at the top
- Note that this is a place where you can manage permissions on who can see this button - see our Permissions section here for more
You're done!
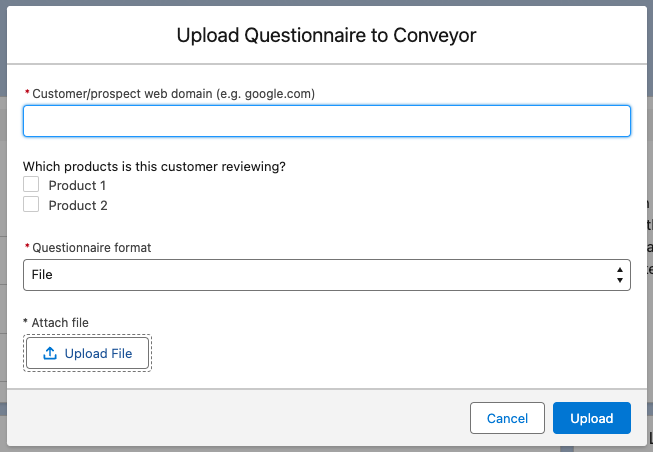
That's it! Now, when you go to a Salesforce contact's page, you should see the Quick Action button there:

Clicking on it shows a modal:

Filling in the fields and clicking "Upload" sends the questionnaire , which you can see in your Conveyor instance, under "Questionnaires".
Permissions
You should only show this button to the users in Salesforce that you want to have the capability of inviting people into your Portal. In addition, each of these users needs to have logged in to Conveyor at least once before using this button so we have a record of that user.
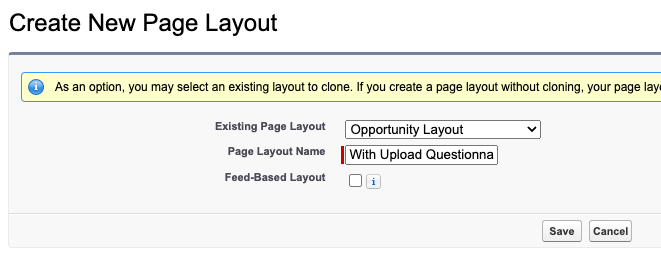
One way to set permissions using Salesforce profiles is to create a new Page Layout from your Opportunities --> Page Layouts page. You can create a profile with the invite button and one without. Then, click "Page Layout Assignment" and you can specify which Salesforce profile sees which layout.
Variations
If this default setup isn't something that works for you, let us know! Since our invite from Salesforce guide works off of the Conveyor API, we are able to easily customize this invite modal your liking.
Updated about 1 year ago