External sources
Time to complete: 10-20 minutes
Prerequisites: URLs for public sites, or integrations configured for private sources (Confluence, Notion, Google Drive)
Connect external sources to keep your Knowledge Library current without manual uploads. Link public websites like your help center or marketing site, or sync private content from Confluence, Notion, or Google Drive. External sources refresh automatically (weekly for public sites, daily for private sources), ensuring ConveyorAI always has access to your latest content without ongoing maintenance work.
Why use external sources
External sources reduce maintenance by connecting directly to where your content already lives:
Automatic syncing: Public sources refresh weekly, private sources refresh daily—no manual reuploads needed.
No maintenance burden: Content updates in your source systems automatically flow to Conveyor.
Broad coverage: Connect entire help sites, documentation libraries, or marketing pages with one integration.
Product-specific tagging: Assign sources to product lines when content applies to specific products only.
Perfect for dynamic content: Ideal for frequently updated materials like product documentation, marketing pages, or internal wikis.
Add public sites
Connect publicly accessible websites like help centers, documentation sites, or marketing pages.
🎥 Watch a two-minute tutorial on adding public sites
- Navigate to Knowledge Base → External Sources
- Click Add Knowledge → Public Site
- Fill in the required fields (see below)
- Click Connect
- Wait for syncing to complete (may take a few hours for large sites)
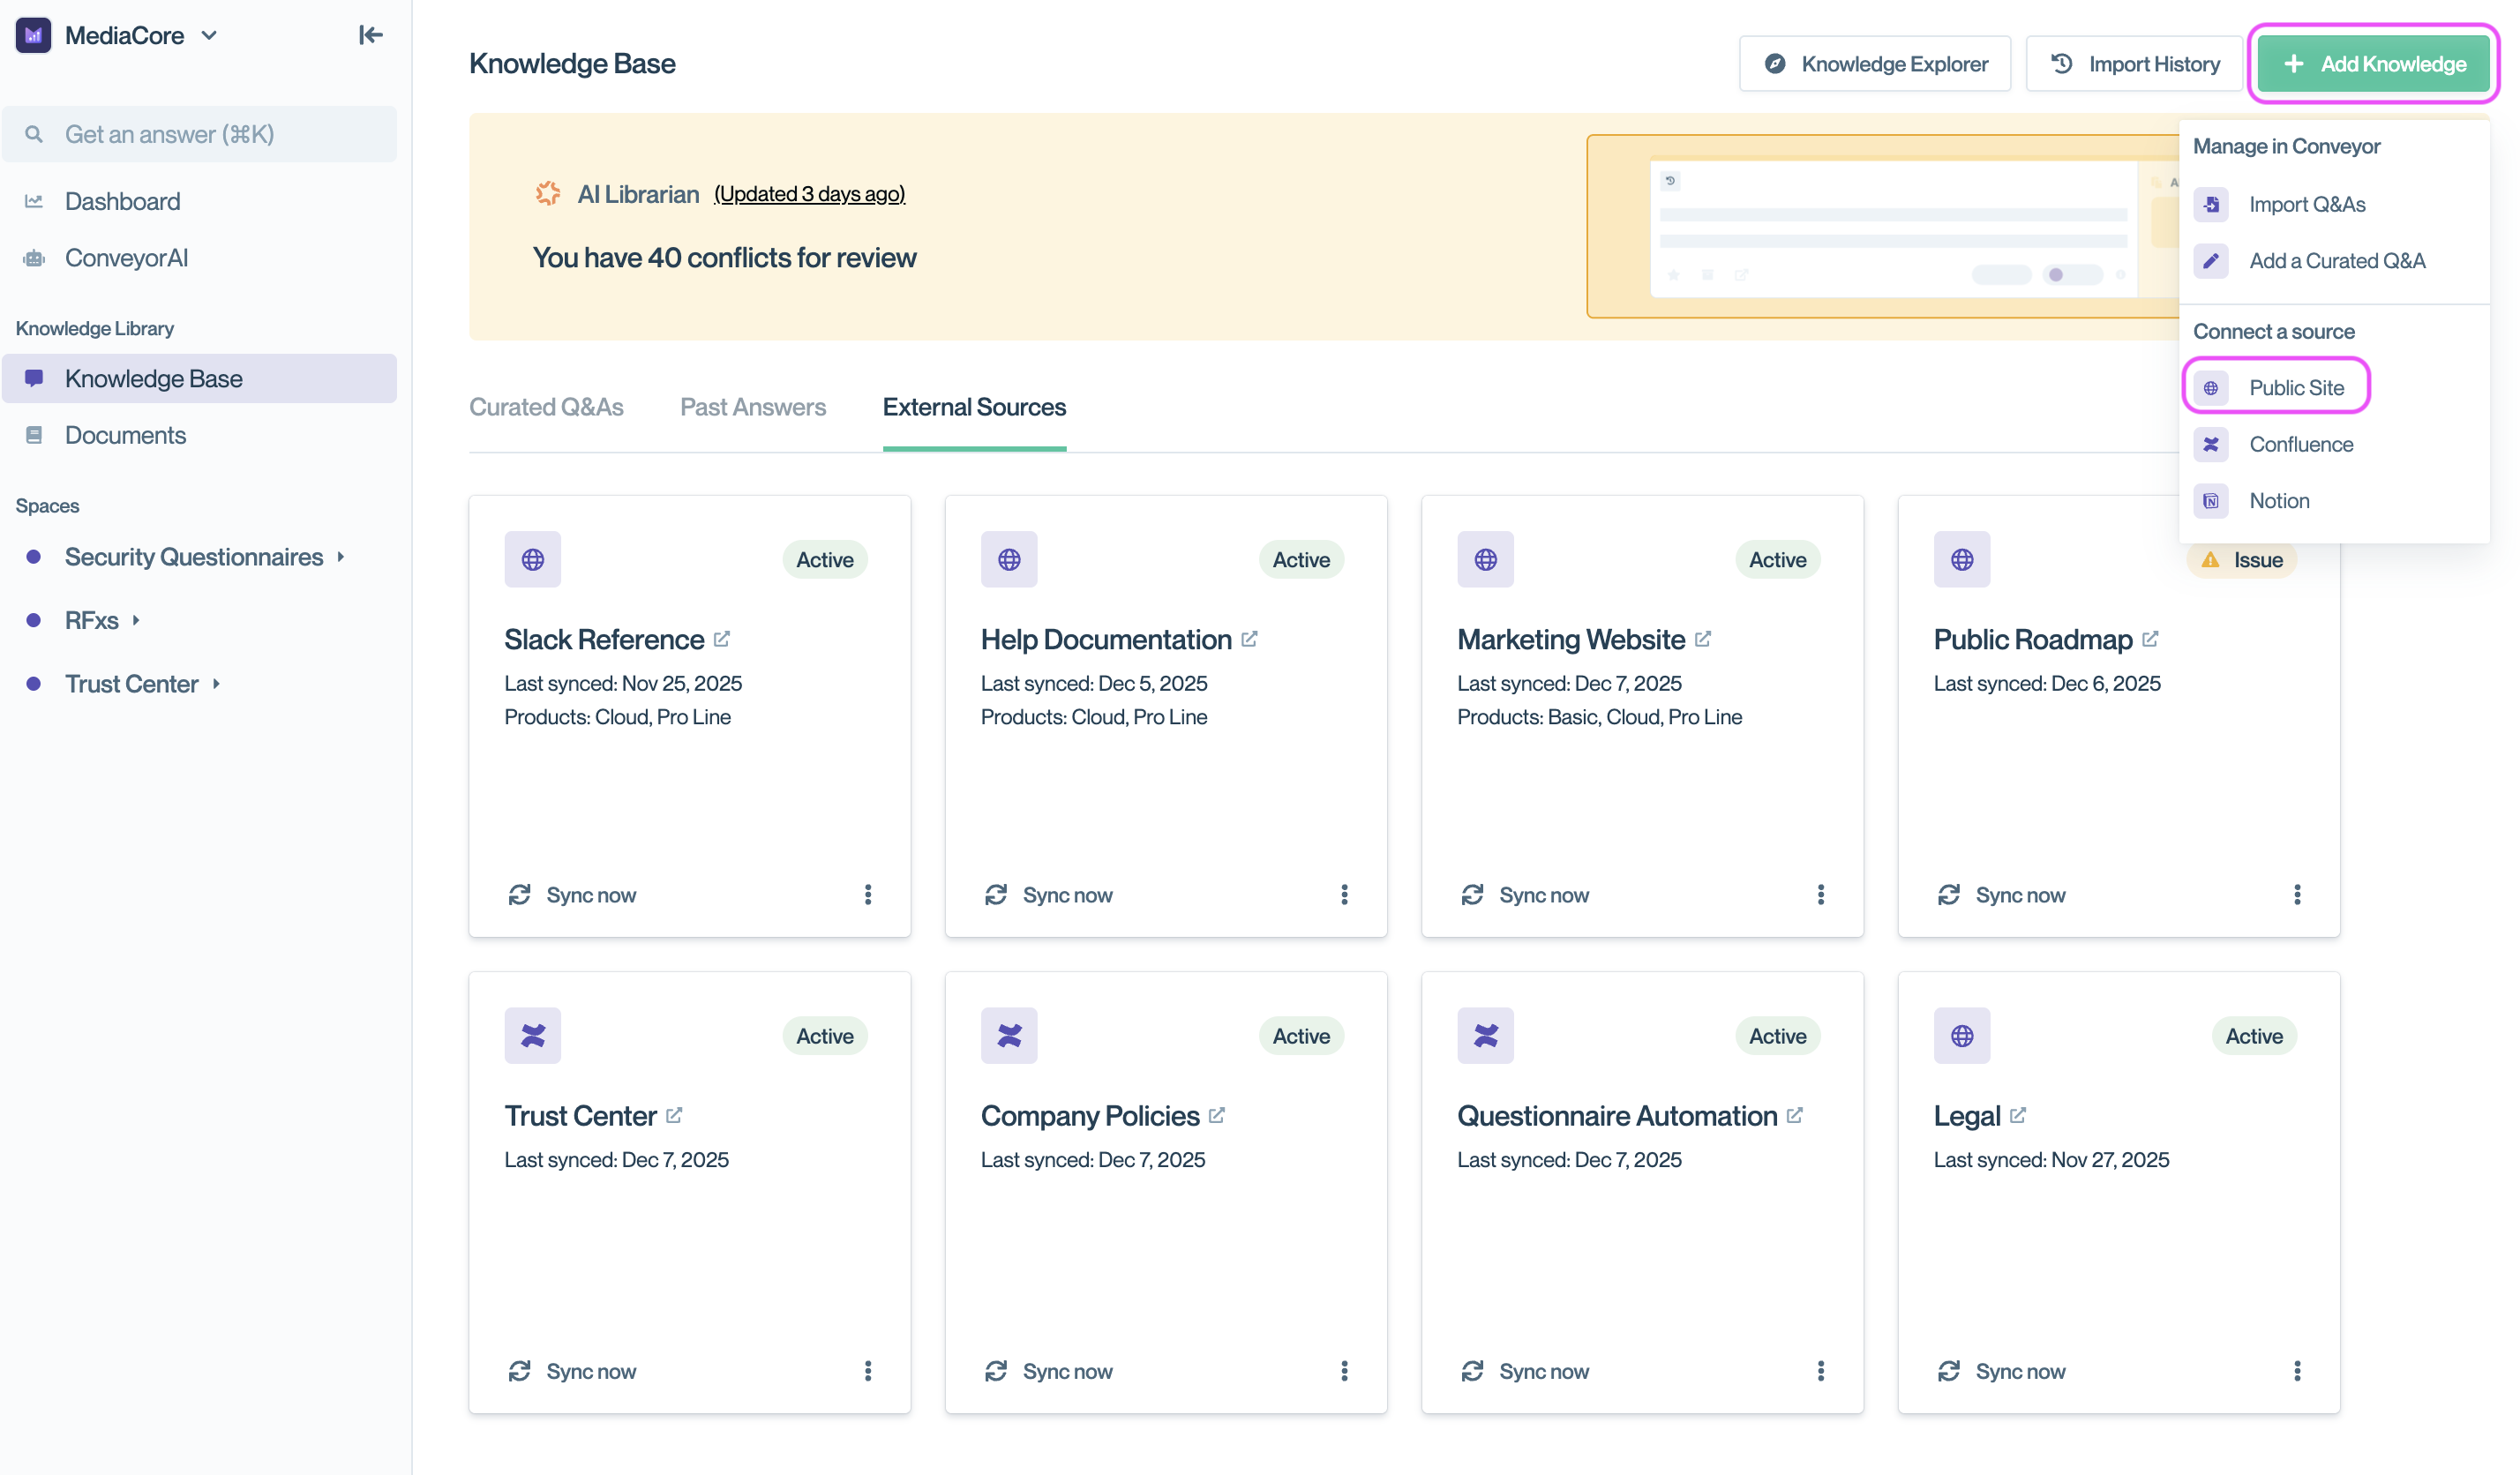
Navigate to External Sources to add public or private sources.
Public site fields
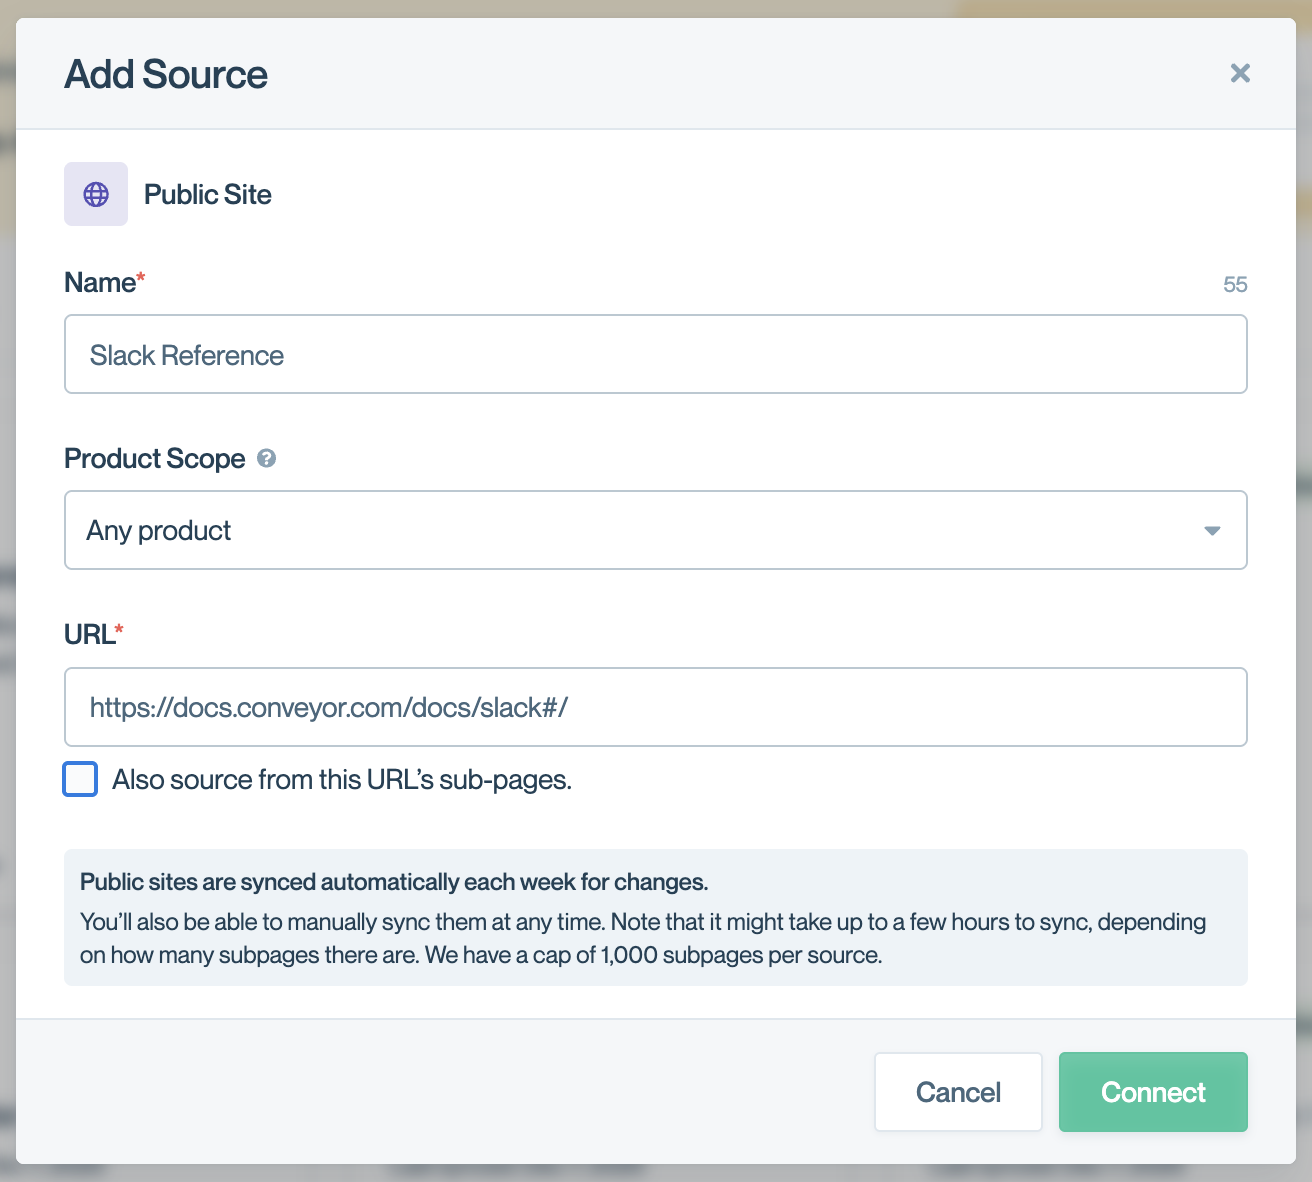
Configure your public site connection.
Name (required): A memorable name for this source, like "Product Help Center" or "Marketing Site."
Product Scope (optional): Tag the source to specific product lines if it applies to only some products. Leave blank for content relevant to all products. Only appears if you have Product Lines configured.
URL (required): The page or root URL to include.
Also source from this URL's sub-pages (optional): Check to crawl all sub-pages under the root URL. Syncs up to 1,000 sub-pages with a maximum depth of 20 levels. Large sites take longer to sync.
💡 Tip: Start with specific pages rather than entire large sites. You can always expand later if needed.
Syncing behavior
Frequency: Public sites sync automatically once per week.
Manual sync: Trigger immediate sync anytime by clicking the sync button on the source card.
Sync time: A few minutes for single pages, up to several hours for large sites with many sub-pages.
Limits: Maximum 1,000 sub-pages per source, crawl depth limited to 20 levels.
Once syncing completes, the source appears as "Active":
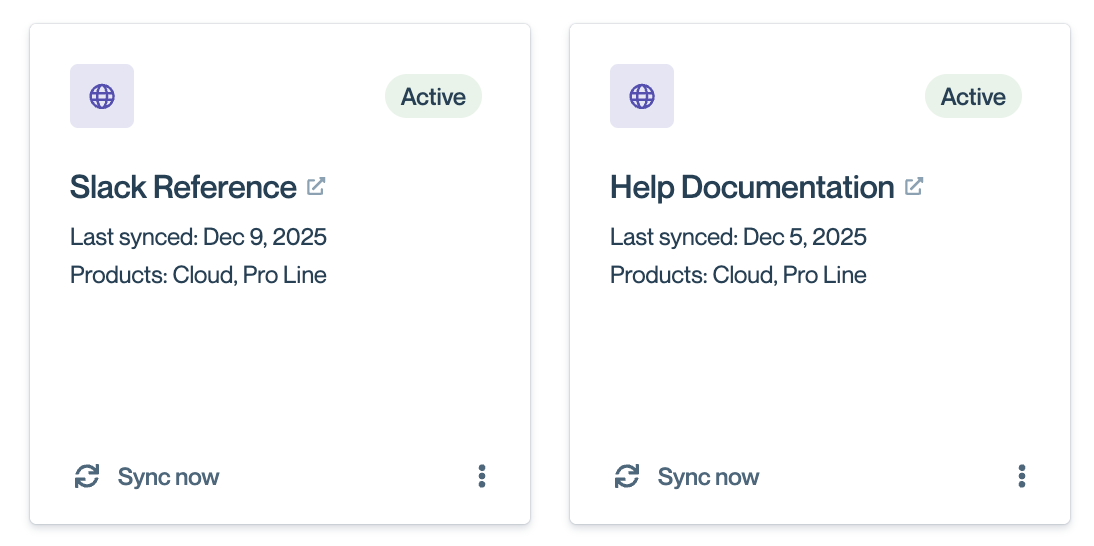
Active external sources show sync status
Add private sources
Connect internal content repositories for ConveyorAI to use:
Confluence: Sync entire sites or specific spaces from your private Confluence instance. 👉 See Confluence Integration for setup instructions.
Notion: Connect Notion pages and databases for product documentation or internal wikis. 👉 See Notion Integration for setup instructions.
Google Drive: Automatically pull documents from Google Drive folders with daily syncing. 👉 See Google Drive Integration for setup instructions.
Syncing frequency: Private sources refresh daily, keeping internal content current automatically.
Configure external sources for ConveyorAI
Control whether ConveyorAI uses external sources when generating questionnaire responses:
- Navigate to Security Questionnaires → Workspace
- Click the gear icon in the Manage Sources section
- Toggle External Sources on or off.
- You can also toggle individual external source cards on or off without affecting others under "External Sources" tab by clicking "Deactivate".
- Click Save
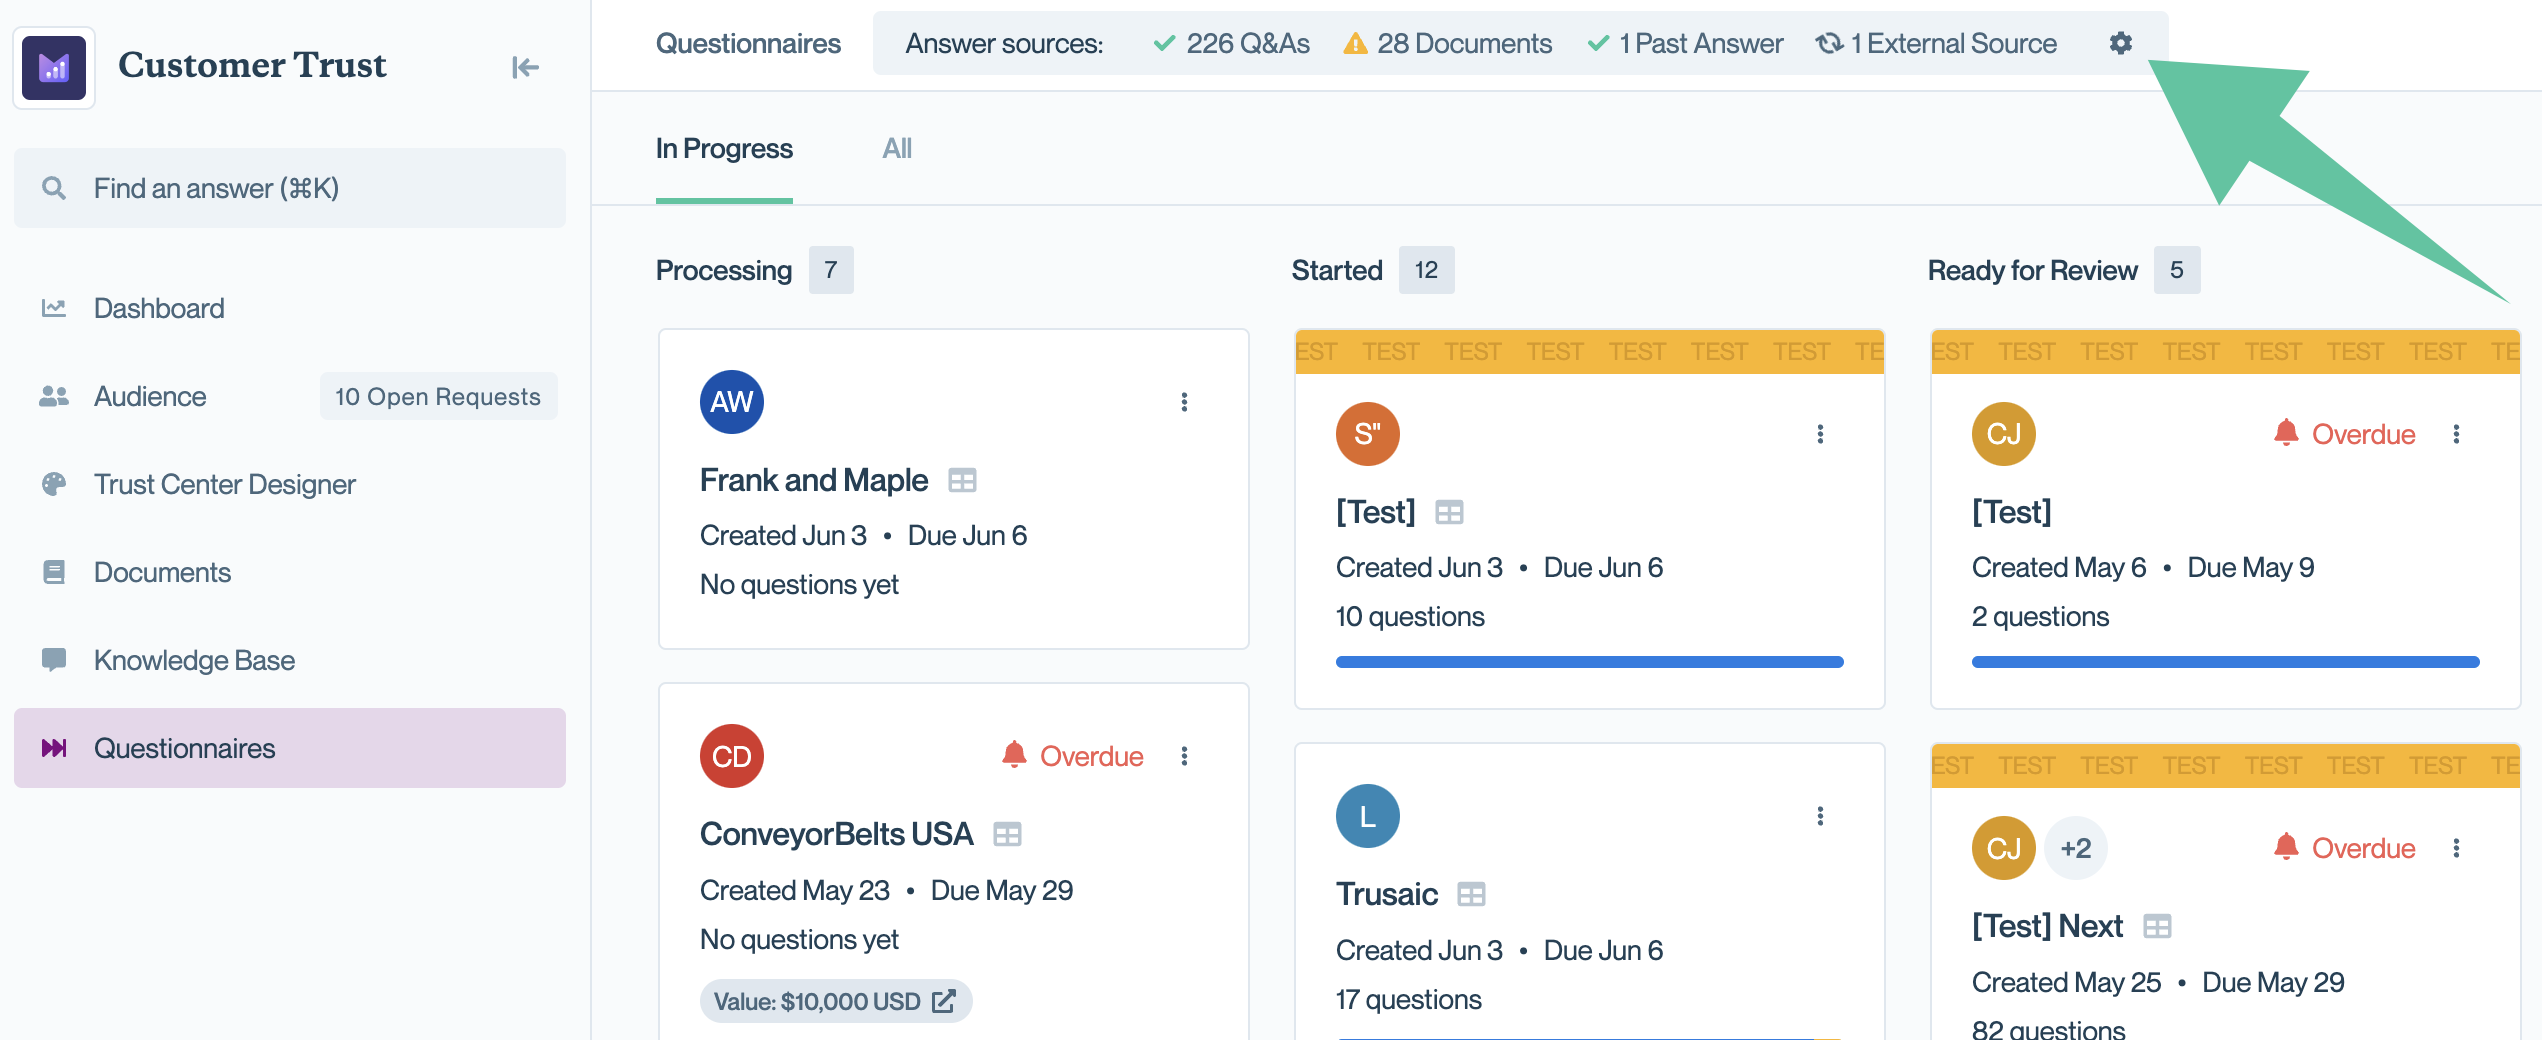
Click the gear icon to configure answer sources.
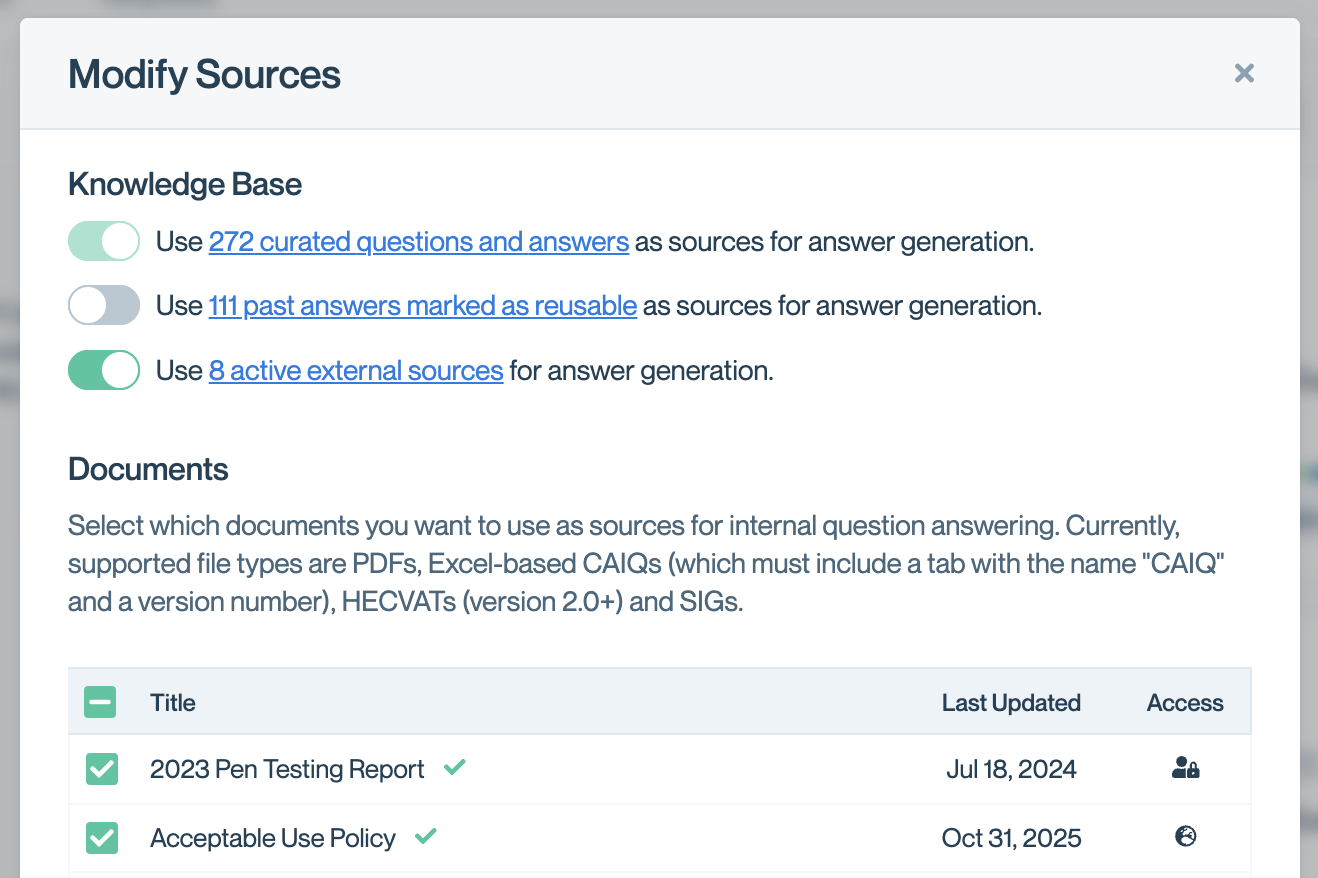
Toggle External Sources on or off for answer generation.
How external sources appear in responses
When ConveyorAI uses external sources, they appear as citations in questionnaire responses:
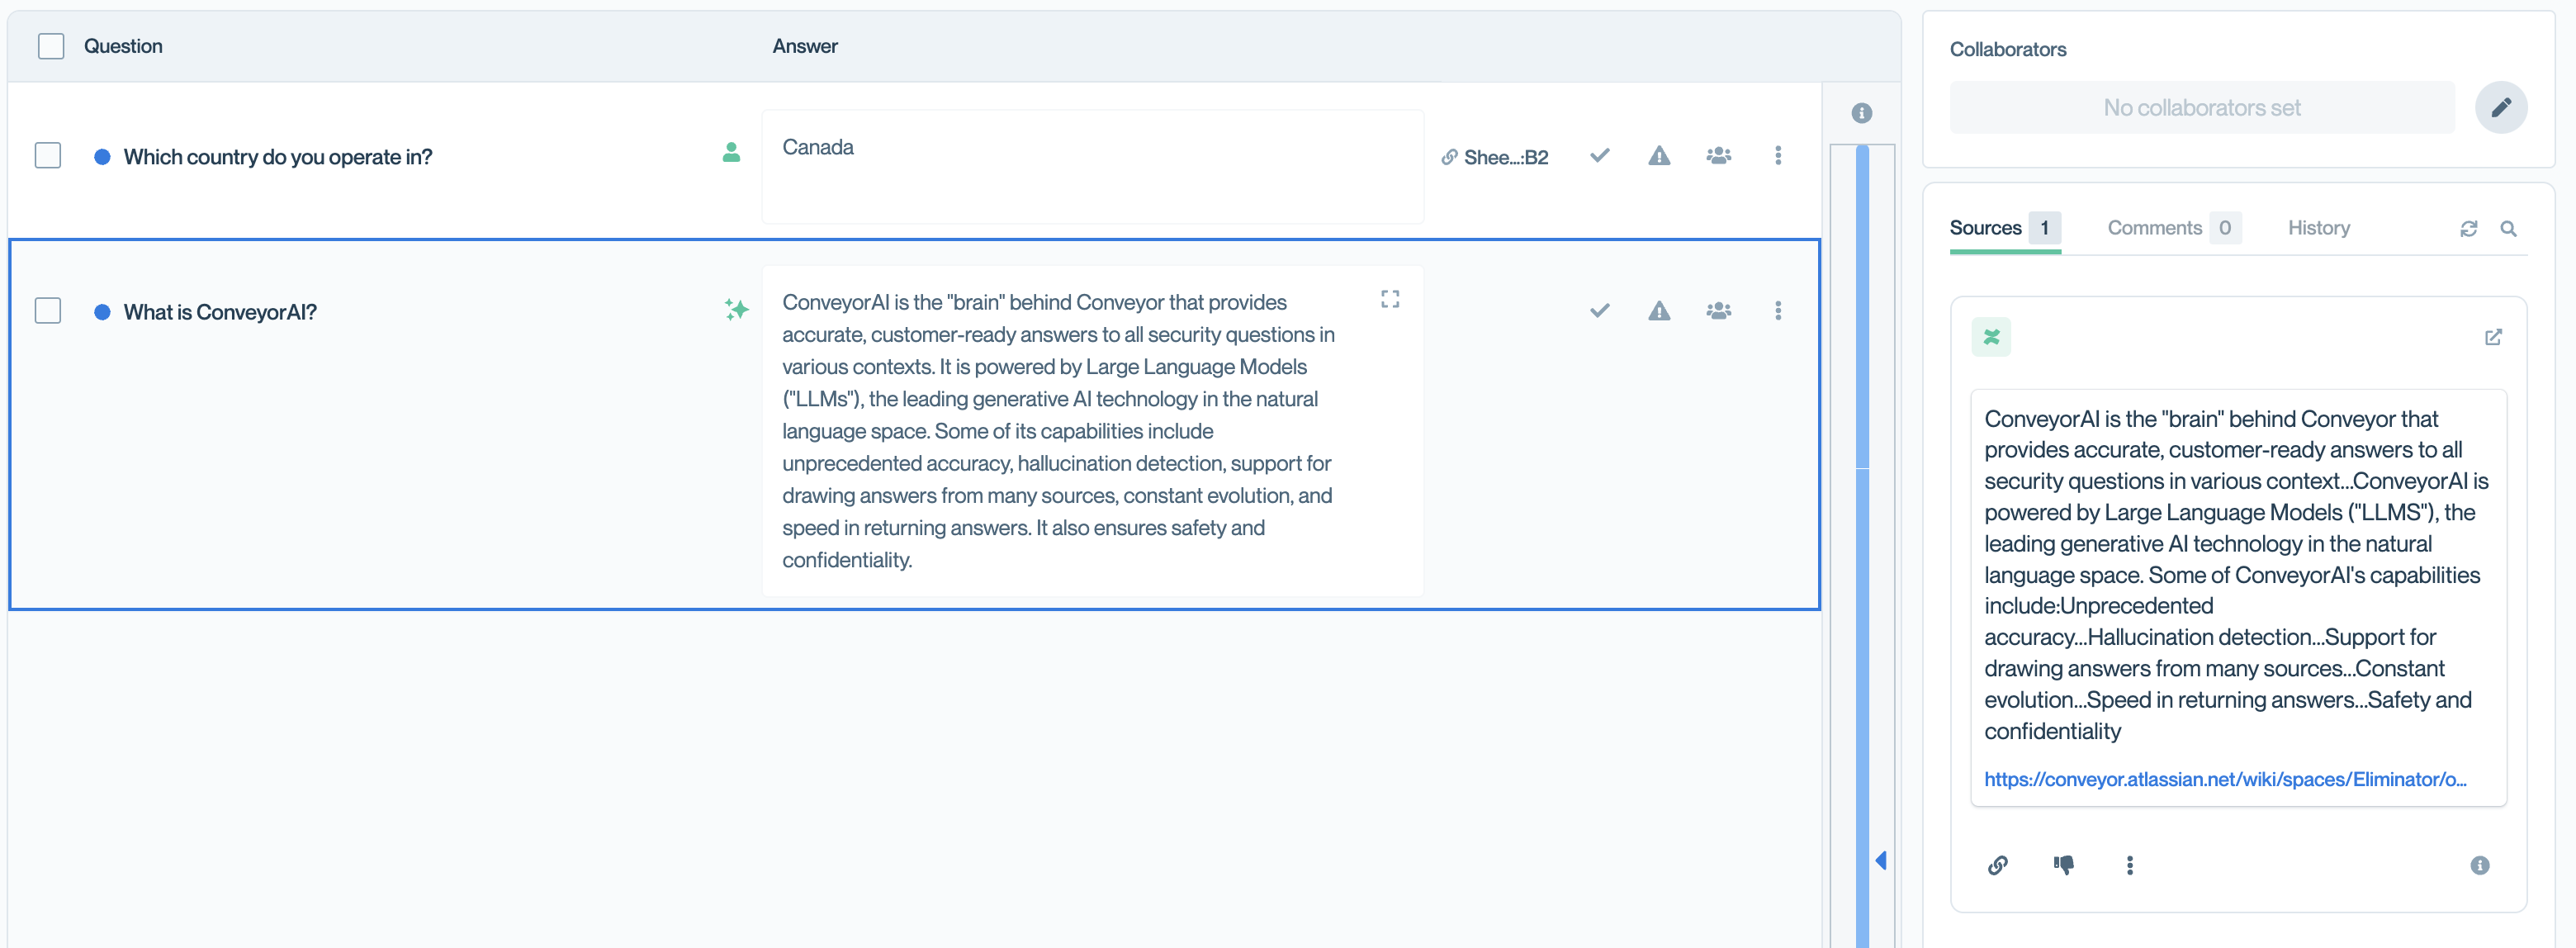
External sources appear as citations in generated answers.
Click the link icon to insert the cited page URL into your answer.
💡 Tip: Click the link icon next to citations to insert direct URLs to referenced pages, making it easy for reviewers to verify information.
Best practices for external sources
Start with high-quality sources. Connect only relevant, well-maintained sites. Poor-quality or outdated content reduces ConveyorAI's accuracy.
Use specific pages when possible. Rather than crawling entire marketing sites, link to specific sections like "/security" or "/documentation" to reduce noise.
Tag with product lines appropriately. Only tag sources to specific products when content genuinely differs. Leave general company information untagged.
Monitor what's being used. Check citations in questionnaire responses to see which external sources ConveyorAI references most often.
Keep private sources organized. For Confluence and Notion, select specific spaces or pages rather than syncing everything. This improves retrieval accuracy.
Common questions
How often do external sources sync?
Public sites sync weekly, private sources (Confluence, Notion, Google Drive) sync daily. You can manually trigger syncs anytime.
What happens if a page I linked gets deleted?
The next sync will remove the deleted page from Conveyor. ConveyorAI will stop using it for answers.
Can I see which pages were synced from a source?
Yes. Hover over the "Active" badge on a source card to see the number of pages synced. Click the card for more details.
Do external sources work with my Trust Center?
No. External sources are for ConveyorAI's use only. They don't appear in your Trust Center. To share content with customers, upload documents directly or link to the external source in your Trust Center custom pages.
What if an external source has conflicting information with my Curated Q&As?
AI Librarian will flag conflicts for your review. You can then update sources or adjust which external sources ConveyorAI uses.
What's next
Need help? Visit the Troubleshooting guide or contact [email protected]
Updated 2 months ago
