Creating a scoped-down Salesforce account
The Conveyor Salesforce integration uses OAuth to grant authorization for Conveyor's Salesforce Connected App. We then use that authorization to fetch your Salesforce data.
Whichever account you use to authenticate, Conveyor will get the permissions on that account when fetching your Salesforce data. That means if, for example, you authenticate using your Salesforce admin's account, Conveyor will likely get permissions to fetch more Salesforce data than we need. If that does not pose an issue for your organization, then authenticating Conveyor using your Salesforce admin's account is the quickest way to complete setup.
However, if scoping down to the minimum permissions is important to your organization, we recommend creating a new user that has only the minimum permissions Conveyor needs to make this integration work.
Creating a scoped-down Salesforce user to integrate with Conveyor
In order to create a user with the minimum permissions required for the Conveyor integration to work, you need to:
- Create a new Salesforce profile;
- Grant access to Conveyor's required objects;
- Check the Field-Level Security for each of Conveyor's required fields; and,
- Create a new user with the new profile assigned.
Note: Examples here will be given in the Salesforce Classic experience, and not the Lightning Experience.
Create a new Salesforce profile
- Go to "Setup"
- In the left panel's quick search input, type "Profiles"
- Click on the search result "Profiles" under "Manage Users"

- On the "Profiles" page, click the button "New Profile"
- Choose an existing profile to clone from. If you pick a profile that already has very minimal permissions, it will be easier to modify it to what Conveyor needs (e.g. Salesforce has a default profile called "Minimum Access - Salesforce" on the "Salesforce" user license)
- Enter a "Profile Name" - something like "Conveyor Integration" would suffice

Grant access to Conveyor's required objects
- After you have cloned a profile, you need to click "Edit"
- You need to uncheck everything except the following:
- "API Enabled" under "System Permissions"
- "Edit Events" under "System Permissions"
- "Accounts", "Contacts", "Leads", and "Opportunities" under "Standard Object Permissions"
- If you plan on sending events and completed questionnaires to Salesforce, you need to check "Edit" for the objects that you want to create events / attachments on (e.g. Account). Otherwise, just checking "View All" will suffice
- Set whatever your organization's policies dictate for "Session Settings" and "Password Policies"
- Click "Save"

Check the Field-Level Security for each of Conveyor's required fields
Unfortunately, just granting View All / Read access to the object might not cover everything. We need to check that the specific fields Conveyor needs are allowed. To do this, we need to check the profile's Field-Level Security.
- From your new "Conveyor Integration" profile's view page, scroll down to the section called "Field-Level Security"

- For each of the objects you need to grant permissions for (e.g. "Account", "Contact", "Lead", "Opportunity"), do the following:
- Click "View" beside the object name
- Click "Edit" at the top
- Ensure each of the below fields are checked for the listed Access
- Click "Save"
Here's a list of the permissions required for the ROI dashboard, which is the minimum set of required permissions.
| Object | Access | Fields |
|---|---|---|
| Account | Read Access | Name, Website. If you are using our NDA bypass feature, you also need to grant access to the field that indicates Conveyor needs to bypass NDA (see docs here). If you are customizing your revenue charts, you also need to grant access to the field(s) that you added. |
| Contact | Read Access | Account Name (Lookup), Email |
| Opportunity | Read Access | Account Name (Lookup), Amount, Is Won (if you have it), CloseDate, Name. If you are customizing your revenue charts, you also need to grant access to the field(s) that you added. |
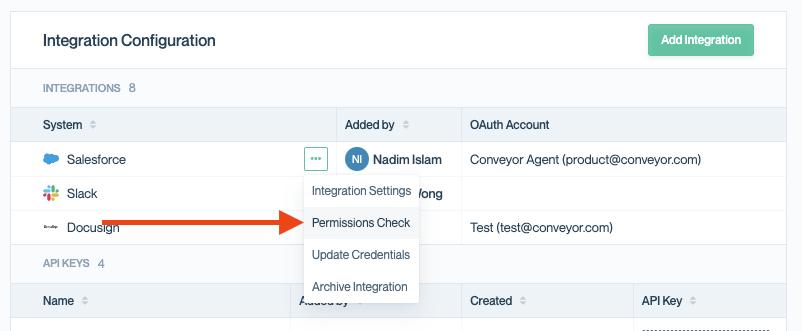
Depending on what Conveyor Salesforce integration features you turn on, you may need more permissions. You can always check what permissions you need vs. what you have already configured by going here and clicking on "Permissions Check".
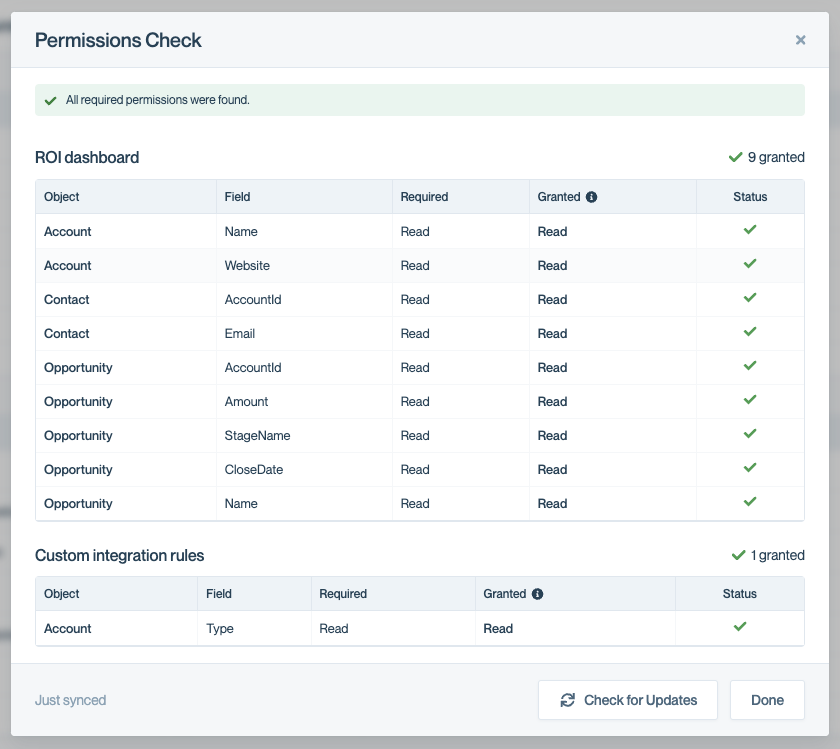
When you see all green checkmarks, you are all set to go!
Note: For any object that you have to "Edit" (e.g. Lead), make sure to check your "Validation Rules" for the object to see if anything is required. E.g. Sometimes Lead Source is required. If so, make sure you fill in that value in Conveyor.
Create a new user
- In the left panel's quick search input, type "Users"
- Click on the search result "Users" under "Manage Users"
- Click "New User"

- Enter the details you would like for the service account user
- Make sure that the "Profile" is set to the one you created for Conveyor. Note that the "User License" determines which profiles can be selected. Check the profile you created to see which user license it falls under.
- Click "Save"

That's it! You now have a user with the minimum permissions that Conveyor needs, and no more.
Using the Salesforce Integration License
Starting in September 2025, Salesforce introduced new restrictions on “uninstalled connected apps.” These changes affect OAuth-based integrations like Conveyor.
Important limitation of the Salesforce Integration license
The Salesforce Integration user license cannot be granted the following permissions:
Approve Uninstalled Connected AppsUse Any API Client
As a result, a Salesforce Integration user cannot perform the initial authorization/install flow for Conveyor if the Conveyor connected app has not already been installed into the org.
If you attempt to connect Conveyor before the app is installed, Salesforce may display errors such as:
app must be installed into orgOAUTH_APPROVAL_ERROR_GENERIC
Recommended setup flow
To use Conveyor with a Salesforce Integration user:
- First, authenticate Conveyor using a full Salesforce user (typically a System Administrator).
- After the Conveyor app appears in:
Setup → Connected Apps OAuth Usage
- Click Install next to the Conveyor connected app.
- Once installed, reconnect using the Salesforce Integration user.
After the app is installed, the Salesforce Integration user can continue using the integration normally without requiring elevated permissions.
Why this happens
Salesforce now blocks most users from authorizing uninstalled connected apps as part of a broader security initiative to prevent OAuth phishing and social-engineering attacks.
Using non-Integration Licenses
If you are using a standard Salesforce user license (for example, Salesforce or Salesforce Platform) instead of the Salesforce Integration license, you can grant the Approve Uninstalled Connected Apps permission to allow trusted users to authorize Conveyor before the app is installed. The Approve Uninstalled Connected Apps permission only allows a trusted user to authorize the app before it has been installed into the org. Installing the connected app is still recommended so that future authentications can proceed normally without requiring elevated permissions.
Create a permission set
- In Salesforce, go to:
Setup → Permission Sets
- Click New
- Create a permission set such as:
Connected App Installer
Enable the permission
- Open the permission set
- Go to:
System Permissions
- Click Edit
- Enable:
Approve Uninstalled Connected Apps
- Save
If your org has API Access Control enabled, Salesforce may instead require the
Use Any API Clientpermission.
Assign the permission set
- Open the permission set
- Click:
Manage Assignments
- Assign it to the user who will perform the initial Conveyor authorization
Install the Conveyor connected app
- Start the Conveyor Salesforce connection flow
- Complete OAuth authorization
- In Salesforce, go to:
Setup → Connected Apps OAuth Usage
- Find the Conveyor connected app
- Click Install
Once installed, your integration user no longer needs the Approve Uninstalled Connected Apps permission to use Conveyor.
Next step
Return to the Salesforce documentation to finish setting up your Salesforce account.
Updated about 2 months ago